Sunday, December 28, 2014

Christmas Nails

I managed to post these on my social media the day of Christmas, but didn't really have time to write it up in a blog post. Who reads this anyways? Here's what I have been wearing since the day before Christmas Eve:


I used a design from Mucking Fusser again, and I must say, this is one of my best water marbles. I got ZERO air bubbles on my design

The greens I used for it are all OPI:
You Are So Out of Lime! (Neons Collection Summer 2014)
Green-Wich Village (Mod About Brights Collection 2008)
Jade is the New Black

I applied a fast drying top coat, used some Nail Vinyls map out the tree shape and painted the black using Wet n Wild- Black Creme. I added dots using OPI- My Boyfriend Scales Walls (Spiderman Collection 2012). The star is from a Lush Lacquer/Polish Me Silly Polish called Tree-Mendous, which I used for my Christmas nails last year.

For the candy canes I used Butter London- Chancer. This polish is awesome, and I don't even like reds. It is almost a one coater, but as always, I applied a second coat, then applied a fast drying top coat using the same Nail Vinyls, I placed them in random thicknesses, and applied a thick coat of My Boyfriend Scales Walls.

And that is it! My next post will probably be my New Years nails.

Wednesday, December 24, 2014

Simple Swatch + Chevron Accent

This isn't your most traditional "holiday" themed nails, but it was released last year as part of Superchic Lacquer's holiday collection, and I managed to snag one this year:


Superchic Lacquer- Ugly Sweater Party

I used three coats here. I could have done two coats, but I felt I could still see my nail line, so three coats it was. The formula is awesome. It is a very sheer grey crelly base on the first coat, but it builds up wonderfully on the second coat. It has tons of green and blue glitters in various sizes as well. Such a beautiful combo!

On my ring finger, I applied two coats of Ooh La Lacquer- Complimint 2.0, applied a fast drying top coat, and layed down chevron NailVinyls. Then I applied one thickish coat of Ooh La Lacquer- I ain't Fraid of No Ghost (Ghostbuster's Halloween Collection 2014).

Superchic Lacquer's site is currently closed for the holidays, but you can get Ooh La Lacquer on Etsy, but these polishes are currently unavailable.

Monday, December 22, 2014

Christmas Skittle

Here is a simple Christmas skittle:


Sorry for only one picture. There wasn't much sunlight!

I started out with two coats of China Glaze- Running in Circles (Cirque Du Soleil Collection 2012) on my index and middle finger. I top coated that, applied some Straight Nail Vinyls in various widths apart, and applied a thick coat of Zoya- Nidhi. Nidhi is a much brighter red, but layering it over the green definitely dulls it down quite a bit.

I applied two coats of OPI- My Boyfriend Scales Walls (Spiderman Collection 2012) onto my middle finger, then applied one coat of KB Shimmer- Kringle All the Way on top. An awesome Christmas shade! It is just silver, green, and red circle glitters in all different sizes, and there is a light sprinkle of holographic micro shimmers in there. 

For my pinky, I applied two coats of Emily de Molly- Seeing Red, and was just going to leave that as is, but I thought it looked like I didn't finish it. So I applied a top coat, applied more nail vinyls, and used Colors By Llarowe- Gemini Rising (Summer 2014 Collection), which is the perfect Christmas green shade in my opinion!

Wednesday, December 17, 2014

Simple Swatch + Water Marble

As promised, here are some more festive nails:


The awesome white, red, and green glitter is KB Shimmer- Holly Back Girl (Holiday Collection 2014). This is your standard amazing formula by KB Shimmer. I have tried a lot of her white crelly base polishes with various colors of glitters in it, and they have never failed to impress me. If you are new to indies and weird glitters, KB Shimmer is definitely the brand to start out with, plus they are one of the most affordable, cheaper than OPI! I used two coats here.

I used three different polishes for the water marble:
OPI- Coca-Cola Red (Coca Cola Collection 2014)
OPI- Jade is the New Black 
Wet n Wild- White Creme

All worked very well, I just can't seem to not get a bunch of air bubbles in my design! Oh well.

Stay tuned for more

Monday, December 15, 2014

Festive Half Moons

Today is officially my first day of my last winter break that I will ever have! I will be out of school for about three weeks, so I will try and do as much nail related stuff as possible! Here are some half moons using some new polishes released for fall:


It has been quite rainy here in Northern California (surprisingly), and this weekend was supposed to be dry and sunny, so I of course wore some holos!

These are holos are both from the Cirque Burlesque Collection released for fall this year. I snagged these during her Black Friday Sale, which I believe was 20% off.... I am trying to do as many festive themed nails as possible, and I think these work well.

The gold/olive green is Cirque- Harlow. I used two coats, although you could easily get one coat if your nails are really short. I top coated that, placed my half moon stickers, and applied a thickish coat of Cirque- Josephine, which is a beautiful deep forest green! I have a lot of holos now, so when I see one in a shade I don't have, I kind of freak out, which is what I kind of did with this whole collection. Although I only got three of the four released.You definitely need these, they are super high quality, come in beautiful packaging, and the formulas are like butter, just like all the other Cirque colors I have tried.

Lastly, the textured polish on my ring finger is Zoya- Chita (Pixiedust Collection Fall 2013). One of the best Pixiedusts out there in my opinion! It is pretty much one coat, even with my nails at this longer length, but I went ahead and did two coats.

Stay tuned for more festive nails

Thursday, November 27, 2014

Thanksgiving Day Nail Art

Happy Thanksgiving!

I managed to do some fun nail art this year for the holiday. I saw this done by Mucking Fusser, aka the water marble queen. I saw it on Instagram and was instantly like yes, I am doing that this year! Mine did not come out as well of course, but I am still pretty happy with the way they turned out considering I have not marbled in a looong time. Here it is:


No matter what, I always get air bubbles!

I would definitely say my middle finger came out the best. The way I made the design on the water made it very hard to place my finger in, and then I of course realized when I was done that I could have just placed my finger in a different way.... oh well.

I started out with one coat of OPI- My Boyfriend Scales Walls (Spiderman Collection Spring 2012).

The colors I used for the marble are also all OPI:
Coca-Cola Red (Coca-Cola Collection Spring 2014)
Toucan Do It If You Try (Brazil Collection Summer 2014)
I Just Can't Copa-Acabana (Brazil Collection 2014)
A-Taupe The Space Needle (Touring America Collection Fall 2011)

Then using a dotting tool, I made the turkey bodies using A-Taupe The Space Needle. This is pretty much my only brown in my collection.

The white for the eyes is My Boyfriend Scales Walls, and the black pupil is Wet n Wild- Black Creme. Lastly, I used Toucan Do It If You Try for the beak!

I hope you liked these as much as I did, and have a fun and happy holiday! Try not to run over anyone with your shopping cart...

Wednesday, November 26, 2014

Gold and Magenta Skittle

I am not the best at describing color names, but I would say these colors are pretty close to magenta...This is just a simple skittle using some new polishes for Winter:


The polish that isn't really new is the gold on my middle and ring finger which is Mod Lacquer- UFO Cover-Up (Above Top Secret Collection 2014). I used two coats for both fingers, then applied a fast drying top coat. Then using binder paper reinforcement stickers and Nail Vinyls, I placed them on the nail where I wanted, and painted one thick coat of Enchanted Polish- September 2014.

The awesome glitters/textured polishes on my index and pinky finger are both from KB Shimmer's Winter 2014 collection. The magenta is Turnip The Beet and the gold is Dressed To Gild. Both were really easy to work with. Dressed to Gild was slightly thicker and super glitter dense, but they were both two coats.

Stay tuned for my Thanksgiving Day nails! They are gonna pretty awesome.

Monday, November 17, 2014

Rainbow Chevrons

I mentioned in this post that I had an awesome idea using these nail vinyls, and I am just now getting around to editing the photos! Better late than never right?


Pretty awesome huh?

I  used the larger chevron stickers from Nailvinyls.

I just painted two coats of the middle color, added a top coat, placed the sticker down the middle of my nail, and painted the other two colors on either side! Here are the colors I used going from left to right:

Index Finger:
OPI- Coco Cola Red (Coco Cola Collection 2014)
Kiko- 357
OPI- Where Did Suzi's Man-Go? (Brazil Collection Spring 2014)

Middle Finger:
OPI- I Just Can't Cope-Acabana (Brazil Collection Spring 2014)
Jessica- Lime Cooler (Gelato Mio Collection Spring 2012)
CK One- 610 Current (LE for Spring 2013)

Ring Finger:
Zoya- Wednesday (Beach Collection Summer 2012)
China Glaze- Exotic Encounters (On Safari Collection Fall 2012)
Zoya- Ling (Tickled Collection Summer 2014)

Pinky Finger:
China Glaze- I Sea The Point (Off Shore Collection Summer 2014)
Illimasqua- Jo'mina 
OPI- Do You Have This Color In Stock-Holm? (Nordic Collection Fall 2014)

Hope you enjoyed! 

Sunday, November 16, 2014

Simple Swatch: Takko Lacquer + Enchanted Polish

I feel bad for showing these polishes because they are so hard to get your hands on! I timed posting this today because Enchanted Polish will be having a pre-order for her LE November, December, and Holiday 2014 polishes today. They are usually mystery polishes, but she just posted a sneak peak of the Holiday polish, and it is gorgeous, so you don't want to miss out! They will on be sale for pre-order for one hour starting at 12 pm PST on her bigcartel. Anyways here are my nails:


This is also appropriate to post now because flakies are making a come back and every indie brand are making their own! I think the only ones available right now are I Love Nail Polish which are on preorder, so you can get them for $1 cheaper. I will hold off for now so I can see more swatches and get the cheaper ones :)

This beautiful flakie polish is Takko Lacquer- Dark Paradise which is a Llarowe exclusive. It is stunning! I wore this a while ago and honestly can not remember if I wore it over a dark purple polish, but if I did, it was probably OPI- Sapphire in the Snow. Then I know I did two coats of Dark Paradise. I remember the formula being pretty sweet too. It is kind of a jelly base, packed with all the flakies, and of course I added a matte top coat. I pretty much only wear flakies with my Essie Matte About You Top Coat. It also makes picture taking much easier!

My ring finger is Enchanted Polish- June 2014. It is a super deep purple holo, but in some lighting, it can almost look duochrome. I used two coats, and formula was perfect of course.

These polishes are definitely expensive, but they are totally worth it! Especially if you are an avid collector like myself. Go get you your Enchanted Polishes at 12pm PST today!

Wednesday, October 29, 2014

Ooh La Lacquer's Halloween Polishes Part 2

I showcased most of Ooh La Lacquer's Halloween polishes in this post here a few days ago. I mentioned that I hadn't worn the one polish that I really wanted, so I wore it in combination with another one of her Halloween polishes, along with one of her other polishes.


Just some simple chevrons

The green is Ooh La Lacquer- Sumer. It is a bright almost neon green holo! Unfortunately the polish on top takes away the holo effect. It is also an awesome formula just like the other polishes from this collection.

I used mini chevron nail stickers from Nail Vinyls for the chevrons, and painted Ooh La Lacquer- Ectoplasmic Residue on top of those.

Lastly, I applied one coat of Ectoplasmic Residue on my ring finger, and applied two coats of Ooh La Lacquer- Beware of the Plastics (Mean Girls Collection). Such a perfect name! And also a gorgeous polish. It is one of those finely milled matte microglitters that is top coat hungry. So I applied one thick coat of Nail Pattern Boldness' Glitter food, followed by one coat of Seche.

Monday, October 27, 2014

Halloween Themed Drip Manicure

I have only done a few Halloween themed nails this year, and they are all purple and green themed for some reason. These are pretty simple, just an indie polish, topped with drip tips:


I loooove this polish!

The polish on bottom is Glam Polish- Frankenslime 2014. It is a re-release from last year, but I believe it is a different formulation and slightly different in colors. I am not too sure, around this time last year Glam Polishes were fairly hard to get for us American's. This is a slightly holo green base, with tiny matte green and purple glitters sprinkled in. I love it!

Then I just did the drips using a dotting tool, and the color is OPI- Do You Have This Color in Stockholm? (OPI Nordic Collection Fall 2014). It looks a little darker in these pictures than it does in person, but all in all fairly easy to work with.

Tuesday, October 21, 2014

Ooh La Lacquer's Halloween 2014 Polishes

Longtime no blog post....

I have gotten a few indie Halloween polishes this year, including the entire set of 4 that Ooh La Lacquer released. I died over the green since I don't have any holo like it, but I also don't have a grey like the one she released, so I just got the whole thing! The collection is Ghostbuster's theme, so I can't appreciate the names as someone who has seen the movie would....

Anyways, here are 3 of the 4 from Ooh La Lacquer's Ghostbuster's collection. Of course I didn't wear the one I wanted the most...


Just a simple glitter gradient

The purple is Ectoplasmic Residue, and the grey is I ain't Fraid of no Ghost. Both were two coats, and flawless formulas. The purple was nearly a one coater. These are some of the more opaque holographic polishes that I have tried from this brand.

The glitter is Eeek! It is a very finely milled glitter, it would take tons of coats to become opaque. It mainly consists of fine deep purple microglitters, and slightly larger metallic green glitters. Very appropriate for Hallowen.

I took these photos right before it was going to start raining, so the sunlight wasn't quite in my favor. So, the polishes don't look as holo as they are in real life. They also have a lot of fine shimmer in them which tend to take away the holo affect as well. I got a slightly blurry shot to show more of the holo and shimmer in the base colors, and more sparkle in the glitters:


You can get the entire set on her Etsy for $35, which is a few dollars cheaper if you were to get all of of them individually.

Monday, September 29, 2014

A Simple Jelly Sandwich

Here is a simple jelly sandwich:


I started off with two coats of China Glaze- Tarty-Y For The Party (Avant Garden Collection Spring 2013). A very nice formula, fairly opaque on the first coat as well.

Then I added one generous coat of Orly- Ultraviolet (Flash Glam Effects Collection). This is part of the chunky glitter collection that Orly put out a few years ago, and I believe some of them are still permanent, not sure about this one though. A lot of the glitters from that line have the sinking glitter problem, but fortunately this particular polish doesn't have that problem. It does slightly, but all you have to do is just hold it upside down before you paint your nails and you get a very glitter dense coat for each nail.

Lastly, I topped it off with OPI- Care To Danse? (NYC Ballet Soft Shades Collection 2012). This a very pale pink shade and is also part of OPI's permanent line as well. It works perfect for layering, I would never wear this alone. You would probably need like 5 coats to get it opaque.

Thursday, September 18, 2014

Yes, More Half Moons

I am in a bit of a nail art rut right now, so I am content with doing everything in half moons or french tips! Sorry, but the creative part of my brain has kind of switched off for quite a while, all though I do have 2 pretty awesome things planned. One I just haven't gotten around to doing, and the other one is using polishes that will be released tomorrow, so I don't exactly have what I need to create the look I am going for... Anyways, here are some more half moons:


Sorry for the boo boo on my pinky, one of my mice bit me real good over the weekend...

I started off with 2 coats of Ooh La Lacquer- Summer Daze (Summer Collection 2014). This is one of the more opaque Ooh La Lacquer holos that I have tried, I love it! Formula was awesome. It is super vibrant purple/fuchsia shade, but the color on top kind of took away from the awesomeness of it. You can see a better swatch here, and why not buy it while your there!

The textured polish on my ring finger is OPI- My Current Crush. This came in a limited edition set last year, so I am not sure how readily available this is.

Lastly, the awesome shimmery purple on my other nails is Orly- Hot Tropics. I am in love with this color! I have had it for a while and am just now getting around to wearing it...so sad. Just in time before summer is officially over. The formula is fantastic. I did one thickish coat on top of the holo, but depending how small your nail beds are, you could definitely get away with one coat with this polish! It is a vibrant purple base with tons of gold and silver shimmers in it. I am so happy the shimmer actually shows up on the nails. This picture is fairly color accurate too, it may be just a little darker in person. Pictures can't really do it justice.....

Wednesday, September 17, 2014

A Luxurious Glitter Gradient

I am calling this luxurious because of the price tag on these two polishes! They are both at the limit of how much I would pay for a polish, and well, I bought them! I don't spend this much money on one polish often AT ALL. I am that girl always waiting for a sale or good deal...


You are probably thinking, hmm, that just looks like an OPI, but it isn't just ANY OPI....

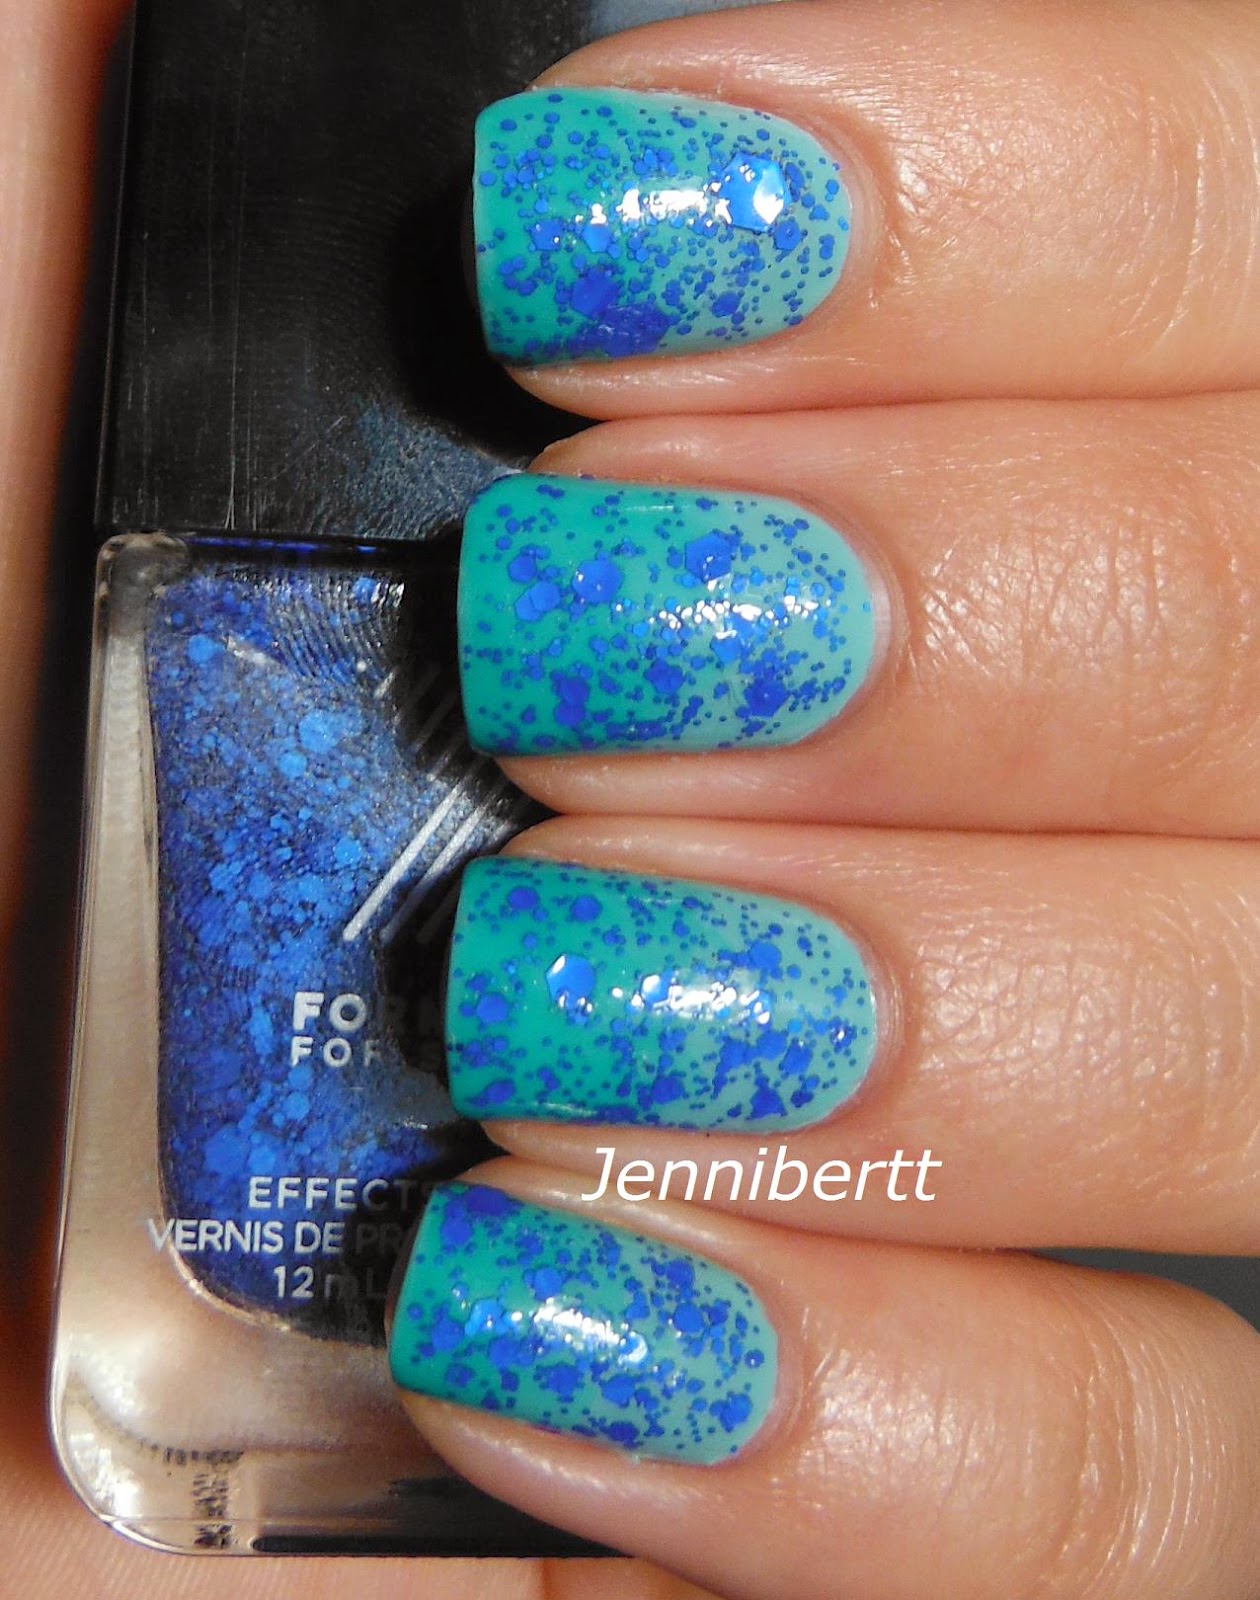
This gorgeous green is the beloved OPI- Damone Roberts 1968. I knew this shade existed before, but had no desire to hunt it down since it was so hard to find and probably ridiculously over priced. It was originally released in 2009, and was only retailing for $9.00, which is normal for an OPI, now. But it was re-released earlier this summer, and is selling for a whopping $20.00.

I honestly had no idea who Damone Roberts was, but apparently he is a fabulous eye brow expert based in Beverly Hills. The color is meant to match the color of his iconic salon walls, and I must say OPI did a great color match!

I really don't have any green like it, and that is saying a lot since green is my main color I swoon over. The only color I could think of that it was closest to in my collection is OPI- Mermaid Tears, but it isn't even close. All Lacquered Up has some great comparisons. I also got all my info about the basis behind this polish from her as well.

Okay, onto the actual formula. Flawless like most OPI cremes. I had a few streaks on the first coat, but the second coat covered those up, and it also dries super shiny! Definitely worth the money if you are a polish hoarder like myself. There are still some available! You can get it here.

The glitter I used is also a super fancy one from Rescue Beauty Lounge in the shade Locavore. I snagged this when she had her 50% off sale last year since I can't see myself spending that much... Sure, they are gorgeous, but why not wait until they are on sale? Anyways, this glitter is perfect for gradients. I have yet to wear it on its own, but you can definitely wear it alone. I think it goes perfect with Damone Roberts, definitely one of my favorite pairings in a while.

Tuesday, September 16, 2014

Simple Swatch: KB Shimmer

Kb Shimmer is one of those brands that I usually hold off on buying because they tend to have stock of all polishes for a long time. They have about one sale a year, so that is when I hoard all the polishes that are on my wishlist. A few months ago I saw various bloggers posting pictures of some KB Shimmer's that were going to soon be discontinued, so of course I had to see what they were. This polish was on my wishlist for ages, and I had to get finally get it, especially since it was on sale!


KB Shimmer- Watercolor

I used two coats here. The base is a semi sheer periwinkle/cornflower blue shade which barely covers the nail on the first coat, but once you add a second coat, you can't see the nail line at all! I probably could have done 3 coats, but ain't no body got time for that!

It has a beautiful mix of glitters, too. It is a mix of large, medium and small metallic purple, magenta, and blue hexagonal glitters, and also has a sprinkle of small and ultra small hexagonal white holographic glitters. And as always, it has tons of glitters like all KB Shimmer's do, but it isn't a thick goopy mess, very easy to work with. I just love it. Too mad it is not available anymore!

Monday, September 15, 2014

Enchanted Polish French Tips

I joined the Enchanted Polish mailing list towards the beginning of the year, so I have been lucky enough to have gotten all the LE monthly polishes since March! The last ones I got was May, June, and July 2014. June is a dark purple, so I will wear that another time, so I paired May and June together:


Seriously amazing polishes....

The orange is Enchanted Polish- May 2014. It is a burnt orange, super strong hollow, and had an amazing formula! Oranges don't agree with my skin tone a lot, but this one surprisingly did! I used two coats here. 

The red is Enchanted Polish- July 2014. The holo in this one isn't as strong, but it is still pretty apparent. It is very saturated. I remember when I swatched it on my nail wheel it was nearly a one coater, and the nails on those wheels are pretty wide and long! 

And of course I used a textured polish for the accent. I used one of my faves, OPI- Jinx (Bond Girls Collection 2013). It is a nice mix between red and orange, so I thought it went very nicely with these!

Thursday, September 11, 2014

Sideways Half Moons

I saw this design on Pinterest a few weeks ago and am finally getting around to trying it out. Everyone knows I love me some half moons because they are so easy, but this is a nice twist to it. I added a little of my own touch by outlining the lines:


As you can see, I need some practice with free handing straight clean lines! I was also going to add some horizontal lines over the blue, but the purple took so long and didn't turn out the way I wanted, so I just skipped those.

I started out with two coats of China Glaze- Be More Pacific (Off Shore Collection Summer 2014). Then I applied the half moon stickers and applied Color Club- Take Me To Your Chateau (Pardon My French Collection Summer 2010). I have fairly curved nails, so this technique wasn't ideal for my nails. No matter how much I pressed on the stickers to make sure it was flat on my nail, the color still managed to bleed so it wasn't a perfect line. So, I will probably not ever be doing this again, especially since my lines that I did to cover up the mess came out so crappy! The purple I used is Floss Gloss- Lean.

Tuesday, September 9, 2014

Simple Swatch + Water Marble

I am gonna keep this short and sweet:


I swear every time I wear Laquerlicious the sunlight is never in my favor.

The glitter is Laquerlicious- Class Act (Lights, Camera, Action Collection Summer 2014). This was kind of tricky to work with. It is very glitter dense, so when applying it kind of clumps up, so you definitely have to work fast with it. I have 2 coats here over white, with 1 coat of Nail Pattern Boldness Glitter Food + 1 coat of Seche Vite.

I tried using colors for the water marble that were as close as possible to the glitter colors, but they aren't quite close enough for me. I used:
OPI- My Boyfriend Scales Walls (Spiderman Collection Spring 2012)
Wet n Wild- Candy-Licious
Zoya- Blu (Lovely Collection Spring 2013)

Tuesday, August 26, 2014

Single Chevron Nail Art

I wanted to just put something simple and bright on my nails when I got back from our vacation. But I can never settle for a simple creme polish anymore. I still have some nail stickers to try out, so I just did the simple chevron down the middle of the nail with two other colors to the side of the main color.


It is hard getting the hang of taking nail photos again!

I started off with two coats of China Glaze- Shore Enuff (Off Shore Collection summer 2014). The first coat of this polish was kind of a pain, so I applied a semi thick second coat and it smoothed out nicely. I added a coat of seche vite and waited for that to dry before applying the sticker.

I used the large chevron stickers from nailvinyls.com.

Then I applied Sally Hansen- Pacific Blue first since the purple, China Glaze- That's Shore Bright (Sunsational Collection Summer 2013), dries so fast and peels off a little when taking the stickers off.

All in all I really love this combo! I got an awesome idea for an even better combo which I will have to try soon!

Monday, August 25, 2014

Yellow and Green Skittle

Long time no see, again. I went on a two week road trip and just got back yesterday, but I didn't have guest posts lined up like I did last year. I also didn't wear polish for the whole two weeks! I tried putting on these China Glaze nail stickers, but they just were not sticking, and they didn't fit the shape of my cuticle line very well. So the first thing I did was do my nails today! Although these nails I am showing today were from well before I left. Here they are:


I used a whole bunch of brands.

I started off with Lime Crime- Crema De Limon on my fingers, except my pinky. Using just one coat on my index, and two coats on my middle and ring finger.

I used the mini chevron stickers from nailvinyls.com. The colors I used for the chevrons going from the darkest green to the lightest:
OPI- You Are So Outta Lime! (Neon Collection Summer 2014)
OPI- Life Gave Me Lemons (Neon Collection Summer 2014)
China Glaze- Be More Pacific (Off Shore Collection Summer 2014)

I used the same three colors for the gradient as well. Then I topped that off with Sephora Formula X- Mind Blowing.

Lastly, I used I Love Nail Polish- Funshine Smoothie on my pinky (Summer Collection 2014). This polish is much more yellow, but it is showing up more gold in these photos.

Hope you like these. I will be posting my nails I did today either tomorrow or the day after!

Wednesday, August 6, 2014

Simple Swatch: Colors By Llarowe

I just couldn't come up with any good ideas for nail art the other day, and I sometimes get overwhelmed with the amount of polish I have. So, I just picked a holo I haven't worn yet:


The perfect green holo for the holidays!

This polish is Colors By Llarowe- Gemini Rising (Summer Collection 2014). This was nearly a one coater, but I did two coats. The formula was flawless, not runny, but not thick, just perrrrfect. And the holo is super strong like all Color By Llarowe holos! Gemini Rising is actually in stock on Llarowe's Website, so go get it!

Lastly, the texture I paired it with is KB Shimmer- Partner's in Lime (Early Summer Collection 2014). Amazing formula as well. One coat is almost full coverage, so you definitely need a second coat.

Tuesday, August 5, 2014

Zoya Tickeld and Bubbly Nail Art

Well, almost all of these polishes are from the Summer 2014 collection, except for one. I saw Jen from The PolishAholic post her version of this, and I was like yes yes, I am doing this when I get my picks from this collection. These are actually all the polishes I got from the collections, minus the one.


I accomplished these the same way as usual. I applied the base color, added a fast drying top coat, placed binder paper reinforcement stickers, and painted the glitter on.

The consistency of theses polishes are pretty much the same. The cremes were all 2 coats, although depending how small your nails are, you could get away with one coat with some of them. The glitters were also the same consistency. I applied a semi thick coat just so I could get a good effect

Here are the colors I used from the Bubbly collection going from my thumb to my pinky:
Zoya- Harper
Zoya- Binx
Zoya- Jesy
Zoya- Stassi
Zoya- Muse

Here are the colors I used from the Tickled collection, with the exception of the orange on my middle finger, which I will just specify in this list:
Zoya- Kitridge
Zoya- Wendy
Zoya- Thandie (Stunning Collection Summer 2014)
Zoya- Tilda
Zoya- Ling

Monday, August 4, 2014

Jelly Sandwich using Loaded Lacquer

Loaded Lacquer is one of those indie brands that sort of just exploded recently. It is probably because of the "Jiggles" collection. The Jiggles is a line of jelly polishes, meant to be used in jelly sandwiches with their awesome glitters. The store was pretty much out of stock for while, but she restocked and I finally snagged the main one I have had my eye on, and it is definitely a staple in ever polish junkies collection:


I also got one of her glitters to use underneath!

I started with two coats of OPI- My Boyfriend Scales Walls (Spiderman Collection Spring 2012). This polish is probably going to be the first full size bottle I use up!

I then used Loaded Lacquer- Wasabi With You? (Sushi Bar Collection Summer 2014). This is a gorgeous mix of medium size glitters in square and hexagonal shapes, in various colors like metallic turquoise, matte green, and holographic turquoise. It also has some tiny micro glitters in there too. Coverage was great, too! I have one coat here.

Then I just applied one coat of Loaded Lacquer- Coconut which is your standard white jelly polish. It makes endless possibilities and now I can make any white crelly like polish combination!

Thursday, July 31, 2014

Another No sponge Gradient

I decided to try another one of these after my last post because I still had two China Glaze polishes from the same collection that I have not tried.


I couldn't quite decide what glitter to use on top. It looks really good on the pink, not so much the purple. It is Mod Lacquer- Technicolor Noise. One of my favorite glitters! It is a mixture of pink, green, and blue glitters in various shapes and sizes. Get it on Mod Lacquer's Etsy.

The two bases I started out with were both two coats. The purple is Lime Crime- Lavendairy. Seriously, these are some of the best polishes out there. They are a cool pastel, yet almost neon, and all the ones I have tried are nearly one coaters! I did two here just because. And for once they are in stock on Lime Crime's Website! The pink is Zoya- Kitridge (Zoya Tickled Collection Summer 2014). It is just your standard bubble gum pink shade.

The Jellies I used were both from the China Glaze Sunsational Collection from Summer 2013. The pink is China Glaze- Heat Index, and the purple is China Glaze- Are You Jelly? The pink was really easy to work with, but the purple is fairly opaque, so you can actually see my brush strokes on my index and pinky.

All in all I am happy with these. Have you tried the no sponge gradient technique?

Tuesday, July 22, 2014

Simple Swatch + No Sponge Gradient

I really haven't got the hang of sponge gradients, so I am just going to stick with the no sponge technique that Rebecca Likes Nails came up with last year. Unfortunately the base I used was a little too dark, so the gradient is not too noticeable...


I started off with 2 coats of China Glaze- For Audrey, a classic. Then I used a little amount of polish to get the gradient effect by using China Glaze- Keepin' It Teal (Sunsational Collection Summer 2013). I did two layers of that.

Then I just applied the glitter, Sephora Formula X- TNT. Seriously phenomenal polish! I used one coat here which was perfect to cover my entire nail! Definitely a must have for any polish addict.