Showing posts with label Essie. Show all posts

Tuesday, March 24, 2015

Simple Swatch + Water marble

Long time no blog! Who reads this anyways? I was honestly thinking about quitting blogging and just uploading on instagram, tumblr and pinterest, but I changed my mind. I have the same excuse as always as to why I have been absent, school. This quarter kicked my butt, and next quarter probably will as well, but I graduate in June! So hopefully that will give me more time to do nails. I have been doing nails and taking pictures of most, but editing photos just takes so much freakin time.

Anyways, here is a lovely polish I wore about 2 months ago along with a water marble:


The glitter is Picture Polish- Unicorn which is one of their collaboration shades with British blogger, Birt Nails. I don't have many Picture Polish shades due to their expensive price tag when you only get 0.37 fluid ounces, but this shade just screamed "buy me!". It is a turquoise base with loads of silver shimmer and packed with medium sized pink and silver glitters. The formula was amazing, I believe I used two coats.

For the water marble I used:
Wet n Wild- Candylicious (pink)
China Glaze- For Audrey (light blue)
Essie- Naughty Nautical (dark blue)

All worked well aside from me getting air bubbles as usual!

Stay tuned for more nails!

Tuesday, February 3, 2015

Flakie Jelly Sandwich

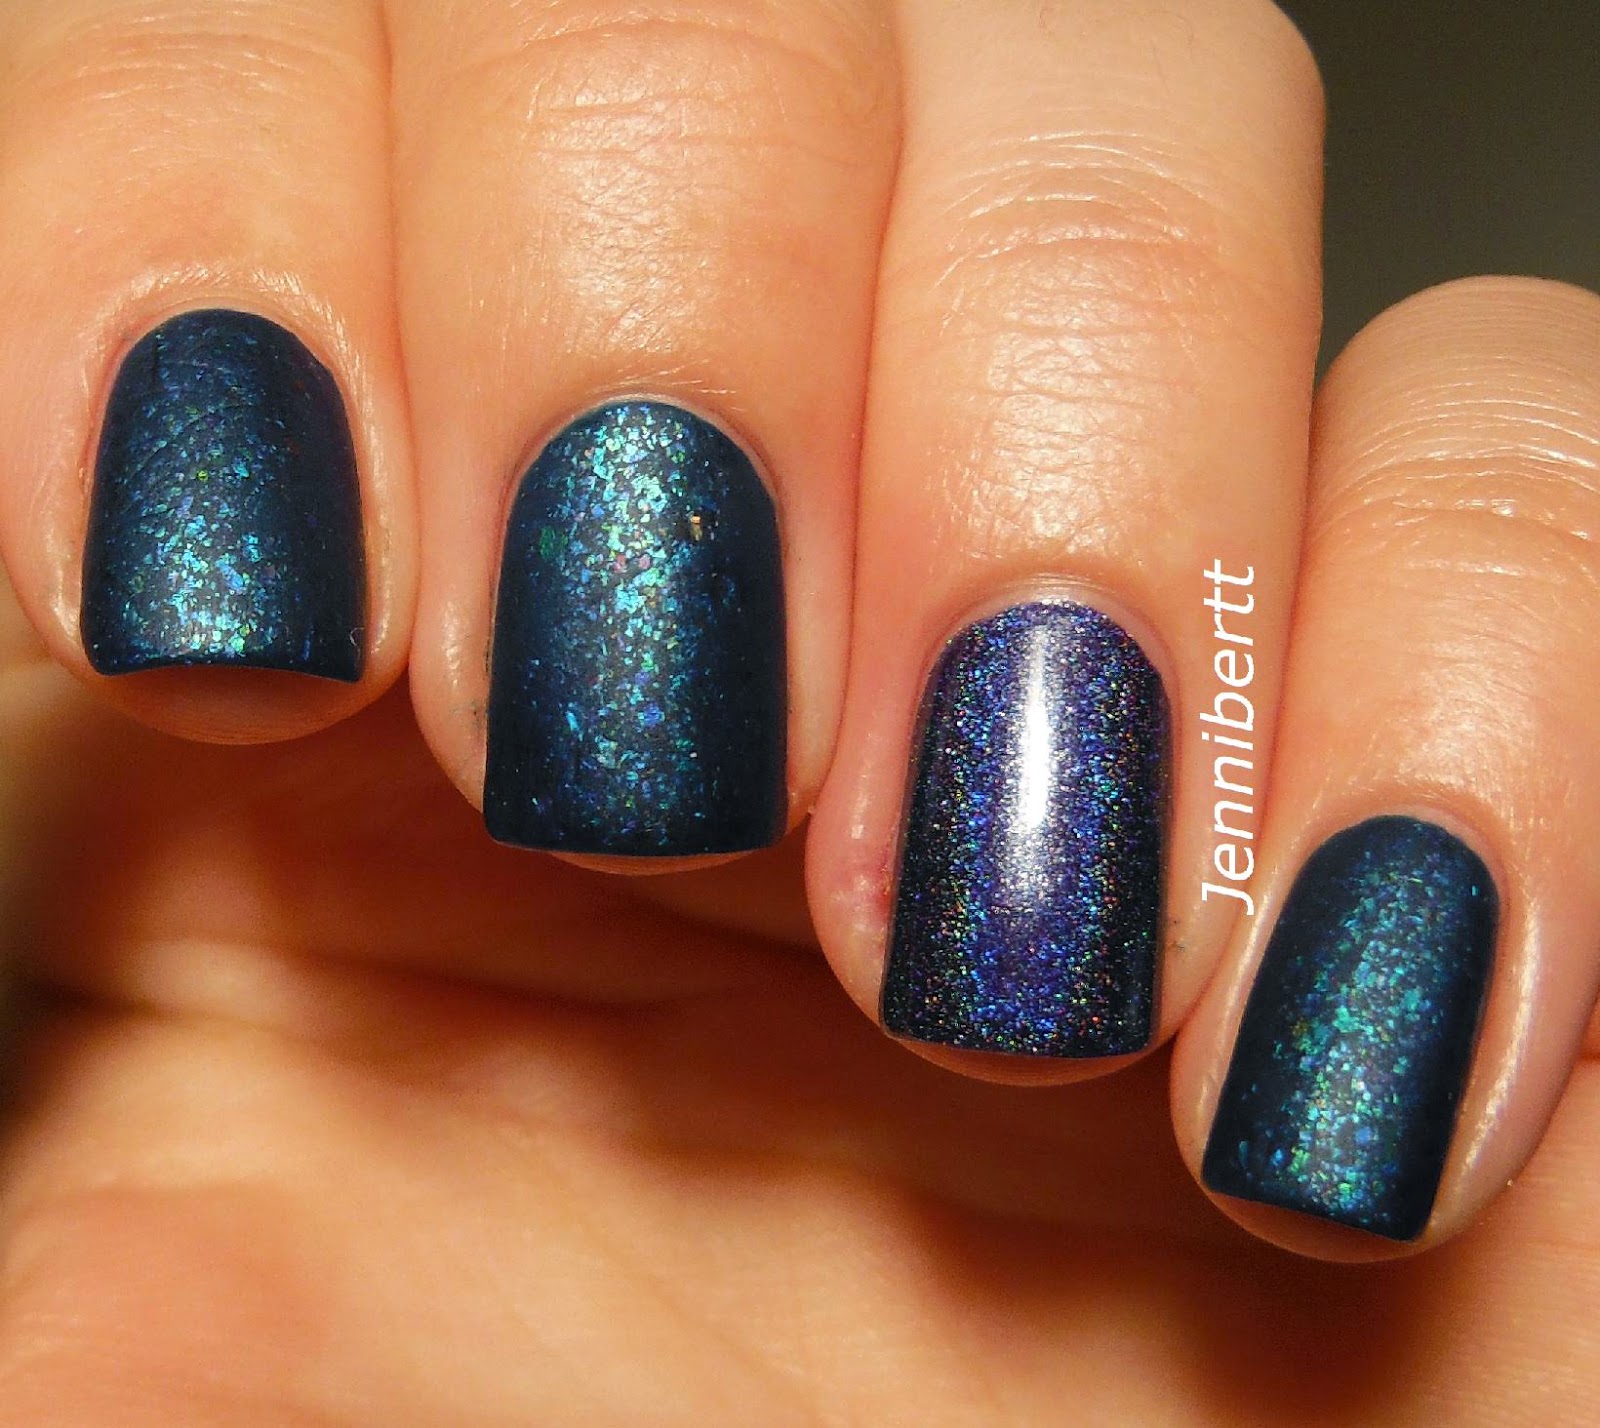
I saw Amy from Mcpolish do this a while ago and of course had to try it. I then followed with what she has said time and time again, "Matte All the Flakies!".


Isn't it amazing? I couldn't stop staring at them when I wore it!

I started off with one thick coat of OPI- Ski Teal We Drop.

Then I used two coats of Polish Me Silly- Flakey Fun which is part of their flakie multichrome collection. I probably could have just done one coat, but I feel the flakies wouldn't have been as strong with the jelly on top.

The jelly I used on top is China Glaze- Ride The Waves (Summer Neons Collection 2012). Probably the most well loved jelly from China Glaze. I applied a thinnish coat just to be sure the flakies didn't get devoured.

The holographic on my ring finger is Cirque- Trocadero (Burlesque Collection Fall 2014). I used two easy coats, this polish was flawless like every other Cirque polish.

Lastly, I applied Essie- Matte About You for that awesome matte effect!

Here is one last photo:


You can get this Polish Me Silly on Etsy along with tons of other great polishes!

Tuesday, May 27, 2014

Long Time No See...

School is my excuse as always... I have been painting my nails, but the sun hasn't always been in my favor for pictures, so I have some photos built up to post, but not too many. Here is what I wore a week ago:


Not the best water marble....

These amazing glitters were released by Lacquerlicious a few weeks ago, which are unfortunately sold out right now. They are nearly neon fully opaque glitters.There are only three colors, so I did a water marble on the finger that didn't have glitter on it. All three were three coats, you could get away with two depending on how long your nails are and how thick you apply them. The colors are:

Beat the Heat
Lemon Limeade
At The Lake

The colors I  used for the water marble:
OPI- Fly (Nicki Minaj Collection Spring 2012)
Wet n Wild- Candy-Licious
Essie- The More The Merrier (Naughty Nautical Summer 2013)

Friday, April 4, 2014

Simple Swatch: Cirque

I added a little nail art to this simple swatch, very subtle:


Cirque- Queen Majesty (Arcus Collection Summer Collection 2013)

I remember this being a build-able glitter, but it would have taken me about four coats, and I wasn't trying to deal with that. Instead, I layered it over Anise- Violet Falls in Love. Then applied two coats of Queen Majesty, followed by two coats of Seche since Queen Majesty is a top coat eater. Once that dried I applied some binder paper reinforcement stickers for the half moon shape, and applied Essie- Matte About You top coat.

I got the idea from Mrslochness who did it with a darker color and hers turned out much better. I will try it with a dark color next time!

Saturday, March 29, 2014

Nail Art Using Superchic Lacquer

I mentioned in my last post that my next post was going to be nail art using the other two polishes I got from Superchic Lacquer. It is very simple, but nice to look at


These glitters are both from the winter 2013 Sleigh Ride Wonderland Collection.

The blue is Superchic Lacquer- Morphamas and the green is Superchic Lacquer- Whoville. They are are both pretty thin jelly bases, so they required three coats. Glitter pay off was very nice though!

Then I just added some stripes on the two middle fingers using Essie- Pretty Edgy.

It looks like these aren't available on Superchic Lacquer's Etsy anymore, but the polish I wore last time is available again!

Thursday, March 20, 2014

Emily de Molly + Glitter Gradient

It has been over a week since my last post... I have been doing my nails, just no time to edit photos and stuff. I have about three posts lined up after this, when they go up, I don't know! Finals are next week so hopefully after that I can do my nails like everyday during spring break! Here is what I did nearly a week ago:


I haven't been too inspired for interesting nail art lately... It is nice to just wear a beautiful indie by itself since it is quick and easy, but not just one boring polish on your fingers.

The main polish is Emily de Molly- Hole in the Sky. A gorgeous periwinkle shade packed with tiny holographic silver glitters, small darker periwinkle and white glitters, large white hexes, and of course the large white circles! Application was a breeze as always with Emily de Molly polishes, except the circles did require some fishing, not much though.

My ring finger has 2 coats of Essie- Bikini so Teeny. This polish is part of their permanent line now. And the glitter is Essie- Stroke of Brilliance (Luxe Effects collection 2012). I haven't done a glitter gradient in a while, so this one is not my best....

Hopefully I will have the next manicure I did after this up tomorrow! It is a good one!

Monday, March 10, 2014

Pipedream Polish- Mcpolish Awesomesauce

This polish was released a few months ago by Pipedream Polish. It was limited edition, but the maker kept on restocking it in small quantities due to high demand. I was never able to snag it until the very last restock. This polish is a thermal, and she did mention she will be re releasing it again, only in a regular polish form. I could not for the life of me get the thermal affect to show :(. My first thermal polish, and I managed to mess it up.... Anyways, here it is:


Pipedream Polish- Mcpolish Awesomesauce

I used the polish on just my index and middle finger so I could do a fun skittle. I got the idea from Mcpolish herself using her own polish. It is a little on the sheer side, so I used three coats. Is that why I couldn't get the affect to show? Or maybe my top coat? I have no idea.... The polish is beautiful regardless. It is supposed to change to a slightly lighter grey. I didn't quite capture the beauty of it since there was like zero sunlight....

For the water marble on my ring finger, I used Essie- The Girls Are Out (Naughty Nauticals Collection Summer 2013) and OPI- Nein! Nein! Nein! OK Fine! (Germany Collection Spring 2012).

I used the same OPI for the base on my pinky, which is nearly a one coater. The glitter on top is Trelly's Misc. Polish- Scruff Bunnies (Halloween Collection 2013).

Monday, February 17, 2014

Mod Lacquer French Tips

This is what I wore on Valentine's Day. Mod Lacquer quickly became one of my top indie brands last year. Jennifer makes some amazing polishes, with amazing quality, and her Spring collection for this year did not fail to impress. Naturally, I got all of them!


Mod Lacquer Spring Confection collection

I could not choose which one to wear first, so I just put all four of the polishes on my fingers! Each finger has 2 semi thick coats of polish. Each one had an amazing formula, glided on the nail like butter. I really have nothing bad to say about any of these polishes, only that it is hard to pick my favorite. I think it is a tie between the green and pink....

The colors are:
Pink Tart
Minty Kiss
Blueberry Bliss
Blackberry Cream

The names make my hungry!

Lastly, I did some colorful french tips using:
Sally Hansen- Fuchsia Power
Essie- Mojito Madness
China Glaze- Sunday Funday
China Glaze- That's Shore Bright

Hope you like these as much as I do. You can get the entire collection on Mod Lacquer's Etsy, all four for the price of three!

Thursday, December 19, 2013

Glitter Gradient + Dotted Christmas Tree

I can't believe I am saying this, but I love this red! I have never been a fan of the color red, therefore don't really own many red polishes. I got this in a swap, and I am in love, although this time of year will probably be the only time I wear it.


A little bit of a fail on the Christmas tree....

The red I used is Essie- Leading Lady (Winter Collection 2012). I used two coats. It is for the most part a dark red jelly base with a bunch of red glitter in it, so pretty! My bottle was a little on the thick side, but some nail polish thinner can help that.

I used two colors for the gradient. I started off with China Glaze- Twinkle Lights (Let it Snow Collection Winter 2011). It has gold, silver, red, and green micro glitters in a clear base, very Christmas appropriate! The very tips has a thicker coat of Orly- Halo (Naughty or Nice Collection Winter 2012). This polish is just a mix of very tiny champagne micro glitters and medium silver hexagonal glitters. I believe this polish is now part of their permanent line.

Lastly, the dotted Christmas tree was made with two China Glaze polishes. The gold being China Glaze- Midnight Kiss, and the sliver being China Glaze- Cheers to You. Both are from the Tis The Season to be Naughty or Nice Collection from 2010.

Hope you enjoyed! Only a few more Holiday themed nails left!

Wednesday, September 4, 2013

Simple Swatch: Emily de Molly

First off, sorry for not posting in a whole week! I did my nails twice since then, but the first swatch's pictures turned out just awful, and the second was a jelly sandwich that just turned out awful! So, today I went with a safe route by trying an amazing Emily de Molly polish, and a water marble! Here it is:


Emily de Molly- Monet's Garden

I really need to get better lighting in my room because it looked like the purple glitters were more of a red... therefore I chose a red for the water marble. The red is OPI- Lost on Lomard (SF Collection Fall 2013), the dark green is OPI- Jade is the New Black, and the lighter green is Essie- The More the Merrier (Naughty Nauticals Collection Summer 2013).

Monet's Garden was two easy coats! It's so amazing! It has sooo many different types of glitter all in a teal jelly base. Here is a macro bottle shot:


You can get these polishes on Emily de Molly's Bigcartel, and for you US ladies, Llarowe will be restocking her old newest polishes very soon! I can not wait!

Friday, August 23, 2013

Simple Swatch: Trelly Polish + Water Marble

I have another Trelly Polish for you today. This brand has quickly became one of my favorite indies in such a short period of time. Cassie has great customer service, and she keeps impressing me more and more when she creates new polishes! She has posted previews of her Halloween polishes on her Instagram, and I am dying to get my hands on them! Here is what I have on today:


Not my best swatch... I painted my nails in crappy lighting

I also couldn't come up with creative ideas for the accent finger like I did with Banana Sorbet and Watermelon Sorbet, so I thought another water marble would be fun!

This is Trelly's MISC Polish- Strawberry Rumba. Such a cool mix of glitter, and there are so many different types in there! Everything from orange and teal bar glitters, large coral circle and hexagons, medium coral hexagons, medium teal squares, circles, hexagons, translucent squares,small coral and teal hexagons, and of course the large teal circles! I am sure I didn't name all the different types of glitters in it, but I love that there are so many, yet it doesn't look too much like glitter vomit. Although I did make my pinky look like a bottle of glitter polish threw up on it... I could do with out the large circles, I really like large circles, but they don't sit well on my super curved nails beds. I always find them snagging on something, so they will definitely work better if you have flat nail beds!

The colors I used in the water marble are all from the Essie Naughty Nauticals Collection for Summer 2013. The coral is Essie- Sunday Funday, purple: Essie- The Girls Are Out, and the teal: Essie- Naughty Nautical. All of them have a slight shimmer, but they didn't show up in the marble too much :( I have said this before, but Essie is great for marbling! I have never had a problem with them like I do with my China Glaze!

Lastly, The base color for my other nails is Jessica- Tangerine Dreamz (Gelato Mio Collection Spring 2012). My all time favorite orange! It is the only orange that doesn't make my hands look gross.

Hope you enjoyed these nails today.

Friday, August 9, 2013

A Subtle Glitter Gradient

Let me just start off by saying this was the hardest manicure to photograph. My camera could not handle the sparkle over load! I probably had a useable photo for every 10th picture I took...Here it is:


Pretty shinies....

I am definitely ready for the new winter collections to come out! I started off with two coats of Essie- Beyond Cozy (Winter 2012 Collection). Then I did a subtle gradient with one of the new ULTA polishes that just came out, ULTA- Boogie Nights. It is mostly a bronzy coppery glitter, but has a light mix of slightly chunkier rainbow glitters in it. It reminded me a lot of the China Glaze Prism polishes. It goes perfectly with the champange color of Beyond Cozy!

The way I got the amazing shine and sparkle was by applying a thick coat of Gelous Base Coat, and then adding another coat of a quick dry ultra shiny top coat! It is like shine steroids for your nails!

And here is a photo of how pretty much all of my photos came out, but it does show the shine and sparkle even more!


Wednesday, August 7, 2013

Simple Swatch + Water Marble!

I feel like it has been forever since I have done a marble. I had enough free time to get one in today! Along with a polish that I have been eying for a while. I de-stashed a lot of polishes from my collection that I no longer want, so I felt that was enough justification to go ahead and finally buy it! Here it is:


I feel like I say this every time I do a marble, but this is my favorite to date! Straight up Mucking Fusser status

The amazing blue polish is Pipedream Polish- Pink Elephants and Lemonade. Such a fun name, and a fun polish! I think I love it so much because I really have not seen a combo like this, at all. I wouldn't think to mix blue with pink and gold/yellow glitter... I don't think I will ever get tired of indie polish as long as they are around!

I used 2 coats. The first coat seemed a little sheer, but the second covers every bald spot up, and it looks so delicious. It is a dusty blue creme base, with medium and small sized pink and yellow glitters, so pretty!

The colors I used for the marble are OPI- Need Sunglasses? (yellow), OPI- Fly (blue), and Essie- The Girls are Out (pink). All worked perfectly, Essie and OPI are definitely my favorite polishes to marble with!

You can get Pipedream Polish on Etsy for $7.50- $8.50, and it is in stock!

Saturday, August 3, 2013

Nail Art for the first ever International Nail Art Day!

I got an email from Nailgasm, the first ever nail art documentry, that today is officially International Nail Art Day. I assume pretty much every nail blogger will be contributing, so of course I am going to as well! I originally wanted to do a marble of course, but I thought I should try a new technique. Thenailasaurus has been posting all these different Waterfall looks, so I decided on that. Here is how it turned out:


I think I did alright for my first time...

I started out with one coat of Mod Lacquer- Dreamland, one of my favorite indie brands. I used two thickish coats. It is the prettiest mid tone purple with a scattered holographic finish!

The three colors I used for the waterfall affect were Essie- Butler Please, Anise- Violet Falls In Love, and Color Club- Revvvolution. I ended up doing some stripes with all three colors, then went in with one of each and filled in the spaces. I probably should have used like 5 colors so it wouldn't look as muted. But over all, I like it! And I will definitely try it again.


What did you do for International Nail Art Day?

Friday, June 21, 2013

Essie Naughty Nauticals Collection 2013 Nail Art

It isn't very common for me to have an entire collection from a nail polish company. I have a really awesome nail mail buddy through instagram that seriously hooked it up! Her daughter's god father is a manager at CVS, and he managed to get us both the entire collection! So, naturally, I used the entire collection to do some nail art:


I didn't think the colors were that unique, until I saw the awesome shimmer in the bottle in person! The formula is great on all 6 shades, all are 2 coaters. My only complaint is that the Jennifer Green doesn't have the shimmer.

The base color on my index finger is Essie: Rock the Boat, which is almost the same color as Essie- Bikini So Teeny. The color I used for the flowers and dots is Essie- Naughty Nautical, probably my favorite color of the collection. I used the same color on my middle finger too, and used Essie- Full Steam Ahead for the flowers and dots. Then I used Essie- The Girls Are Out for the base on my ring finger, and Essie- Sunday Funday for the flowers and dots. I used the same colors as my ring finger but opposite for my pinky. Lastly, I used Essie- The More The Merrier for the centers of the dots

All in all I love the collection, and I have found that only one of the color is dupe-able. My top picks would definitely be Naughty Nautical and Sunday Funday.

Saturday, June 8, 2013

Rainbow Stripes

I am still trying to master stripes! They are so freakin hard. Maybe I should just try tape... Here is what I came up with:


As I have mentioned before, I will never get tired of rainbow nails!

I just used the brush from the bottle, and simply painted half of each nail.

The colors I used are: Index finger: Sally Hansen- Fuchsia Power, and Jessica- Tangerine Dreamz (Gilato Mio Collection Spring 2012).
Middle finger: Jessica- Banana Peel (Gilato Mio Collection Spring 2012), and Finger Paints- Sexy Sundress.
Ring finger: Essie- First Timer (Resort Collection 2013), and OPI- Fly (Nicki Minaj Spring 2012).
Pinky finger: Color Club- Endless Summer (Fiesta Collection Summer 2013), and Essie- Play Date (Go Overboard Collection 2012).

After the polish dried I just used Orly Instant Artist- Crisp White to do the stripes! I definitely need to work on them more... But either way I love how they turned out.

Saturday, June 1, 2013

Illimasqua Speckled Half Moons

I have had these polishes for a really long time, but of course hadn't tried them yet. Nail polish hoarder problems... Here are more half moons! I hope you aren't getting too tired of these.


Sunlight

Shade

I made sure not to cut out any part of the beautiful Illimasqua bottle!

I started out with two coats of the base colors, and applied my Poshe fast drying top coat before applying the stickers for the half moon shape.

The green is Essie- Navigate Her (Navigate Her Collection 2012, now permanent). And the purple is China Glaze- Light As Air (Up & Away Collection Spring 2010/ Electropop Collection Spring 2012). I made sure not to choose base colors that were identical so you could actually see the shape, unlike my Easter Nails.

Then I just applied one coat of the Speckled polishes. The green is Illimasqua- Mottle and the purple is Illimasqua- Speckle. Both applied amazingly. No problem with getting glitter on the nail, and it is such a perfect balance of big chunky glitter and tiny glitters in a creme base.

I can't wait till the next time I go to my nail supply shop and get Nubar- Black Polka Dot so I can make endless amounts of looks like these Speckled polishes. Lucy's Stash has a great tutorial on how to do it!

Wednesday, May 1, 2013

Finally, another Water Marble! (fail)

I meant to post these yesterday so I would have 13 posts for April, falling short of my goal for 20 posts. Oh well, school is over in like 4 weeks, so that will give me a lot more time! Well, I had some time to do a marble, and this one gave me a lot of trouble. The polishes I used spread on the water perfectly, so I thought it was going to be an amazing one. But! Every time i dipped my finger where I thought it would look the best, it kept coming out all muddy...Here it is:


Oh yeah, and air bubbles galore!

I am actually pretty happy with the middle finger, the rest, not so much. I started out with a base coat of OPI- My Boyfriend Scales Walls (Spider man Collection 2012). The three colors I used were China Glaze- Sunday Funday (Avant Garden Collection 2013), Essie- First Timer (Resort Collection 2013), and Color Club- Sunrise Canyon (Fiesta Collection 2013).

I really recommend Essie polishes for marbling. They are great!

I will also show you the first finger (my thumb) that I did. It came out the best, and was all the rage on instagram. I normally don't show my thumb since it is usally a weird length compared to my other nails, but it came out so perfect!


If only they all came out like that...

Friday, March 8, 2013

Jelly Sandwitch + Glitter Gradient

I am going to keep this post short and sweet, but at least I have something to show you!


This is my first time doing a glitter gradient starting at my cuticles. It is so much harder than a gradient starting at the tip of the nail! Since the main color is a flakie polish, I just had to try it out with a matte top coat!


You can see the flakies better now. Plus when I took my second set of pictures, the sun decided to come out.

I started off with one coat of HITS- Can Can, which I think is long gone now. I got it from Llarowe when it was on sale. The glitter I used for the gradient is Essie- Stroke of Brilliance from their Luxe Effects line, and is fortunately permanent! Lastly I added Essie Matte About You top coat.

Hope you enjoyed this! I have a class that is ending soon, so hopefully that will alloy more time for nail stuff!

Tuesday, January 8, 2013

Polish Days: Something New

My first Polish Days post! Polly Polish created this challenge where basically a group of bloggers set a theme for the month, and choose a day to post it! I missed out on the bling theme for last month, so I made sure to do a manicure in time for January. Here is what I decided to do:

Sunlight

Shade

Water Marble!!! This one is just so spring like! So was my previous manicure. I can't wait for all the Spring collections to start coming out, pastels and cremes are my fav!

I think Water Marbling is the first nail art technique that really made me drool. It also inspired me to get into nail art more. When done right, they are just so gorgeous! This is my second attempt at it, and I must say I am very pleased with the outcome. The first time I tried it was almost a year ago, and it was a little worse than this one. I used too many colors considering it was my first time, and I ultimately destroyed every nail while taking the tape off. I won't even bother with showing you the pictures of it. The only flaws on this manicure really are the air bubbles right in the center of my middle finger, and its a little messed up around the cuticles. Other than that, I love them!

I started out with a base of two coats of OPI- My Boyfriend Scales Walls, I am learning to like this polish.The blue I used was China Glaze- Aquadelic which was from their Electropop collection Spring 2012. The green is Essie- Mojito Madness from their Summer 2012 collection. And the purple is Wet n Wild- On A Trip from their Megalast line. I used Mojito Madness in my first water marble and it really is a great polish to use for marbling, I definitely recommend it!

I can't wait for next months theme!